As promised in my last post,
here is a short guide with some tips and tricks for building a documentation website
for an R package using pkgdown.
In the end, this guide ended up way longer than I was expecting, but I hope you’ll
find it useful, although it often replicates information already available in pkgdown documentation !
Prerequisites
To build a website using pkgdown, all you need to have is an R package
hosted on Git Hub, with a file structure “tweaked” with some functionality
provided by devtools.
Assuming you are using RStudio, and that you didn’t already do this, open the project corresponding to your package and (as a minimum) run:
require(devtools)
use_readme_rmd()
use_news_md()
use_vignette("test")  #substitute with the name of your package
Since to use pkgdown your package must be on Git Hub, you may also want:
use_github_links()
, which will populate automatically some fields in the DESCRIPTION file successively used to build the home page of your website.
Other possibly useful commands (depending on the status of your package) may be:
use_travis()
use_cran_badge()
(see devtools documentation for further info)
At this point, within your package file structure you should have a README.Rmd
file (which is used also to create the “README.md” file for Git Hub), and a
NEWS.md file. You should also have a _**man **_subfolder containing the
.Rd files documenting your functions (usually auto-generated from roxygen
comments using devtools::document()). Finally, you should have a my_package.Rmd
file in the _vignettes _subfolder (which is used for example by devtools::build_vignette()
to automatically create a vignette for the package).
Getting Started: creating a bare-bones website
To create a standard pkgdown site, just run:
devtools::install_githb("hadley/pkgdown")
library(pkgdown)
build_site()
build_site() will do several things:
- create a “docs” subfolder in your file structure, where it will place all the material needed for rendering the website;
- knit README.Rmd to “docs/index.html”. This will be the home page of your website;
- knit NEWS.md to “docs/news/index.html” (in this way, any time you update NEWS.md, the news section of the website can be automatically updated;
- knit all your “Rd” files to “docs/reference/” as html files inheriting the name of the function (e.g., “docs/reference/myfun_1.html” “docs/reference/myfun_2.html”, etc.). A “docs/reference/index.html” page is also created: this is a simple html page linking to the html documentation pages for the different functions. By default, all functions will be included and listed in alphabetical order.
- knit any Rmd files in your “vignettes” subfolder to “docs/articles” as single html files;
- Scrape your package for various other info (e.g., Authors, Git Hub address, License, Citation, badges, etc.) to create additional material on the right-hand side bar of the home page;
- Put everything together by some magic to build a working website, and open a preview in RStudio Viewer or your browser.
The resulting website will look more or less like this:
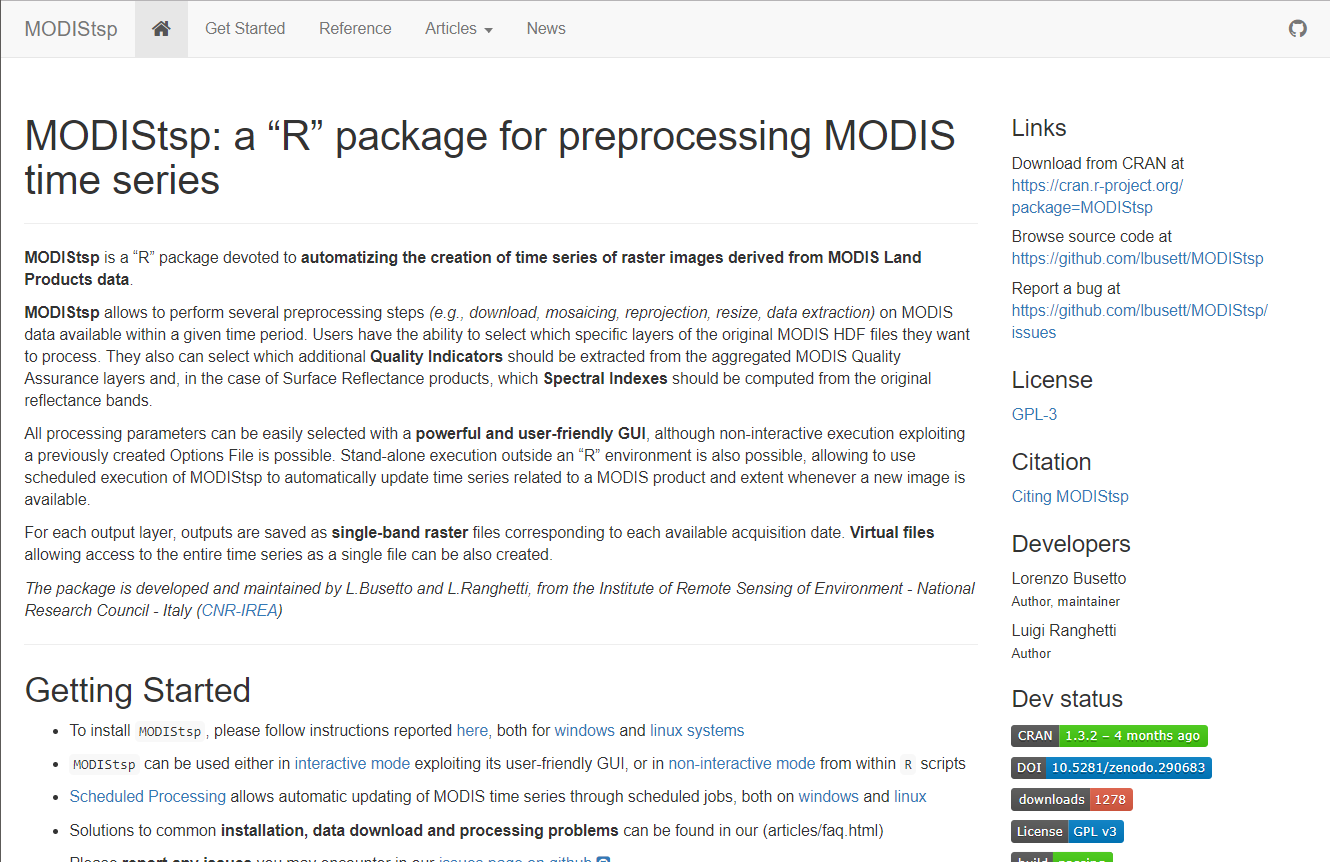 “Standard” website built by pkgdown::build_site()
, with your main vignette linked in Getting Started, and all the other Rmds found in vignettes (if any) linked-to in the Articles drop down menu.
Considering that all is needed is to run build_site() (in particular if
the package is already using devtools tweaks), I’d say that this is already a nice
result ! However, spending some time in better configuring the structure of the
site and tweaking some small things allows to achieve a much nicer result, as
explained below.
Customizing appearence and structure of the website: the pkgdown.yaml file
Your pkgdown website can be further customized by creating and customizing a text file named _pkgdown.yaml in the root folder of your project. The file needs to have three main sections, which I will describe here using the current .yaml file used in the MODIStsp Website as an example (the complete file can be found here).
The Preamble Section
This is quite straightforward: first of all, give a title to your website and provide its URL. Then, select a template to customize its appearance from the ones available at bootswatch. Finally, add the GoogleAnalytics tracking code if you wish.
title: MODIStsp
url: http://ropensci.github.io/MODIStsp
template:
  params:
    bootswatch: flatly
    ganalytics: UA-12345678-0
The Reference Section
Here, you can configure the page of the website **containing the index to the documentation of your functions **(docs/reference/index.html). Instead than having a simple list in alphabetical order, you can define different groups and decide which functions to put in each group.
Each group is defined by a title, a description (use ~ for no description), and a contents section containing an indented list of functions to be included in that group. Syntax and indentation rules must be strictly followed but are very simple. Looking at the example below should suffice for understanding it. In this case I decided to use only two groups: one for exported functions, and one for everything else, but you can set-up as many groups as you need.
reference:
  - title: Exported Functions
    desc: Functions exported by MODIStsp
    contents:
      - '`MODIStsp`'
      - '`MODIStsp_extract`'
      - '`MODIStsp_addindex`'
      - '`install_MODIStsp_launcher`'
  - title: Internals
    desc: Internal functions and helpers
    contents:
      - '`MODIStsp_GUI`'
      - '`MODIStsp_process`'
      - '`MODIStsp_process_indexes`'
      - '`MODIStsp_process_QA_bits`'
      - '`MODIStsp_read_xml`'
      - '`lpdaac_getmod_dirs`'
      - '`lpdaac_getmod_dates`'
      - '`lpdaac_getmod_names`'
      - '`MODIStsp_check_files`'
      - '`MODIStsp_vrt_create`'
      - '`bbox_from_file`'
      - '`reproj_bbox`'
The Navbar Section
The last section of _pkgdown.yaml is named navbar, and is where most the customization occurs.
In the first line, you can choose if using a standard or inverse color scheme for your boootstrap template. The only way to understand what this does is to try both and see which one you do prefer.
 navbar:
   type: inverse
Next, you can define what content will be accessible through buttons or menus on the left side of the top-menu of the website.
- Buttons linking to a single page are described by:
- a title text or an icon name (chosen from http://fontawesome.io/icons/) that will be shown on the button;
- a hyperlink to the page that will be accessed through the button (Note
that the hyperlinks are built relative to the root of the “docs” folder created
by
pkgdown- no need to specify full paths !).
- Dropdown menus giving access to multiple pages are described by:
- a title text or an icon name;
- a “menu:” line;
- an indented list of the text entries that will appear in the menu, with the associated hyperlinks.
In the example below, you can see how the content should be indented and organized:
left:
  - icon: fa-home
    href: index.html
  - text: "How To"
    menu:
    - text: Installation
      href: articles/installation.html
    - text: Interactive Execution - the MODIStsp GUI
      href: articles/interactive_execution.html
    - text: Non-Interactive Execution from within R
      href: articles/noninteractive_execution.html
    - text: Standalone Execution and Scheduled Processing
      href: articles/standalone_execution.html
    - text: Outputs Format and Naming Conventions
      href: articles/output.html
    - text: Accessing and Analyzing Processed Data from R
      href: articles/analyze.html
    - text: "Examples of Use"
      href: articles/examples.html
In the case of MODIStsp website, I decided to not provide a link to the “full” vignette (which was linked from “Getting Started” in the “bare-bones” website). Instead, I divided the contents of that vignette in six shorter articles accessible from the “How To” dropdown menu.
To do that, I just had to create six separate Rmd files within the vignettes folder.
All Rmds within that folder are automatically knitted by pkgdown when launching
either build_site() or build_articles(), and are therefore available
for linking from the menu.
Finally, in the last section of _pkgdown.yaml you can specify what content should be accessible from the right-hand side of the top menu. Syntax and indentation are identical to what described above.
right:
  - text: "faq"
    icon: fa-question-circle-o
    href: articles/faq.html
  - icon: fa-newspaper-o
    text: "news"
    href: news/index.html
  - icon: fa-file-code-o
    text: "functions"
    href: reference/index.html
  - icon: fa-github fa-lg
    text: "github"
    href: https://github.com/ropensci/MODIStsp/
In MODIStsp website, we are using the right side of the top menu bar to provide access to:
- a static page containing a FAQ;
- the auto-generated news page (by linking to news/index.html);
- the function documentation index page (by linking to reference/index.html);
- an icon linking to the MODIStsp repository on Git Hub. (From the example, you can see that it is possible to associate the “buttons” with both an icon and a short title text. In that case, the icon and the text will be shown one after the other.)
Once your .yaml file is complete, just** run build_site() again **and check the
results. Then iterate ad-libitum until you are satisfied by the resulting structure.
Fine tuning
When you are satisfied with the structure of the website, you can start tweaking its contents to achieve a better-looking final result. Here I’m just** sharing some tips and tricks** I learnt while building our website:
- If (like me) you wish to have a different “home page” in the website and in the main Git Hub page, you can create a new index.Rmd file in the root of the package. If index.Rmd is found, it is used instead than _README.Rmd _to populate the home page;
- Text in the “standard” output is a bit too “compressed” for my taste. You
can increase the spacing between the main sections of an article by simply
adding a
at the end of each main section; - Similarly, you can add line separators between sections by simply adding a line of underscores under each section;
- To reduce the “wall of text” effect, you can put any of the http://fontawesome.io/icons/ icons in an article by inserting its “full html specification” in the text of the corresponding Rmd. (For example,“I want a github icon here: class=“fa fa-github aria-hidden=“true”>” would render in the website with a “Git Hub octopus” icon at the end);
- Of course, you can add any image/R plot by linking/creating it in the Rmds of the different articles or of the home page;
- If you build the site using** **build_site(run_dont_run = TRUE), the examples with the “dont_run” specification in the roxygen comment will be run, and their results appear in the documentation page of each function. I find this really useful to illustrate the typical behaviour of functions;
- To provide modifiers to the standard pkgdown.css and pkgdown.js files,
create a new folder named “pkgdown” in your project root. As described in
pkgdowndocumentation, “the content of files “extra.css and “extra.js” placed in this folder will be copied to docs/ and inserted into the after the defaultpkgdownCSS and JSS”. I for example added the following lines in extra.css to have some additional syntax highlighting in the code snippets:
  {
  .fl      {color: blue;}
  .fu      {color: blue;} /* function */
  .ch,.st  {color: orange;} /* string */
  .kw      {color: black;} /* keyword */
  .co      {color: green;} /* comment */

  .message { color: gray;   font-weight: bolder;}
  .error   { color: red;  font-weight: bolder;}
  .warning { color: purple; font-weight: bolder;
  }
, but if you are more fluent than me in _css _and _js _you can probably tweak appearance a lot more.
- you don’t need to run the whole build_site() every time you wish to adjust something and check the results. You can use build_reference(), build_news(), build_articles() and build_home() to update just some sections.
Below, you can see how the .yaml file described before and the other small “tweaks” improved the appearance of MODIStsp homepage :
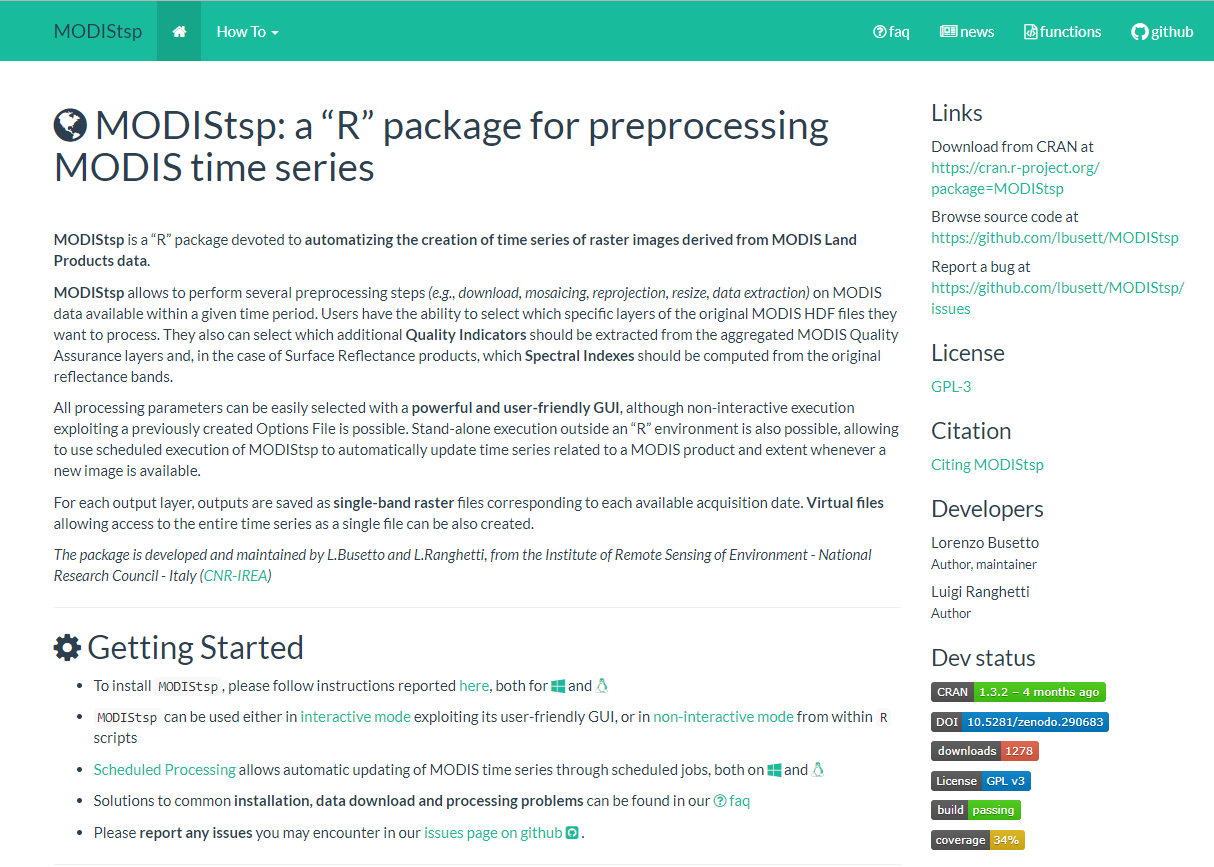 Final Home Page of the MODIStsp website
Deploying the website to Git Hub and the web
Finally, it’s time to deploy the website. To do that:
- Commit and push your changes to the remote;
- Login on Git Hub, navigate to your repo and select “Settings”.
- Scroll down to find the “Git Hub pages” subsection and, under “Source”, select “**master branch/docs folder” **(from this, you can see that it is fundamental that your website material is pushed to the master branch)
- click on the link of your website and… congratulations: you just published your new pkgdown website !
(PS: if you find any errors in this guide, or you think additional clarification is needed, please leave a comment to this post !)